


Probox MushPro S Grow Tent - Garden Highpro
Cultivation Material
€95.00Price
To access our site, you must confirm that you are at least 18 years old.


Growing mushrooms at home is a booming trend, and Tatandi cultivation kits make this experience simple, fun and accessible, even without prior experience. In this guide you'll find all the keys —from preparation to harvest— so you can watch your own magic mushrooms grow easily.
The Tatandi kits are designed to offer an accessible and uncomplicated experience. Thanks to their closed and intuitive system, they don't require bags or previous steps during the first stages. This not only reduces the risk of contamination, but also simplifies the process, making it ideal for both beginners and experienced growers.
To ensure the success of your cultivation, have the following materials ready:
Nothing like seeing your first mushrooms sprout... but first, it's time to prepare the ground (literally).
Let's get to work!
Hygiene is fundamental for cultivation success. Always keep the work area disinfected and wash your hands or change gloves every time you handle the kit.
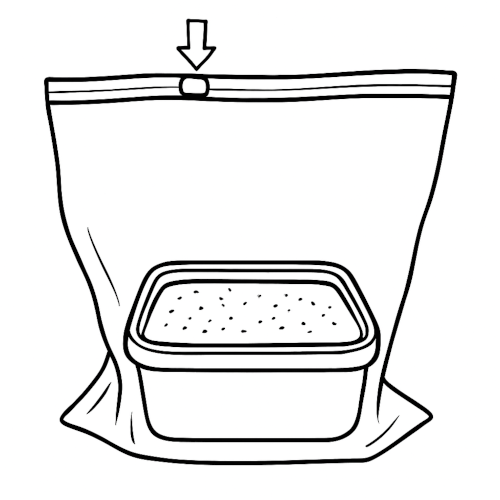
Using sanitary gloves, remove the security seal and open the kit lid completely for exactly one minute. This step is essential for the mycelium as it allows the substrate to take oxygen for the first time, initiating the fruiting process.
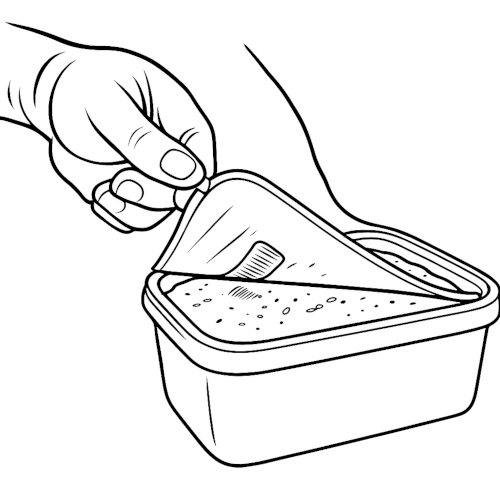
Replace the lid, closing it at all marked points except at one corner where you initially opened it. This small opening (no larger than 1mm) will provide the necessary ventilation without compromising internal humidity.

During the first days, open the lid daily for one minute to provide additional oxygenation. This is also the ideal moment to observe the appearance of the first pins or primordia.
Keep the kit at a temperature between 21-30°C (with 23°C being the ideal temperature), with indirect ambient light and away from direct heat sources.
Place your kit in a location with soft or indirect light, always avoiding direct sun exposure or intense heat sources. Additionally, keep it away from strong air currents and avoid placing it near the floor or in low areas of the room.
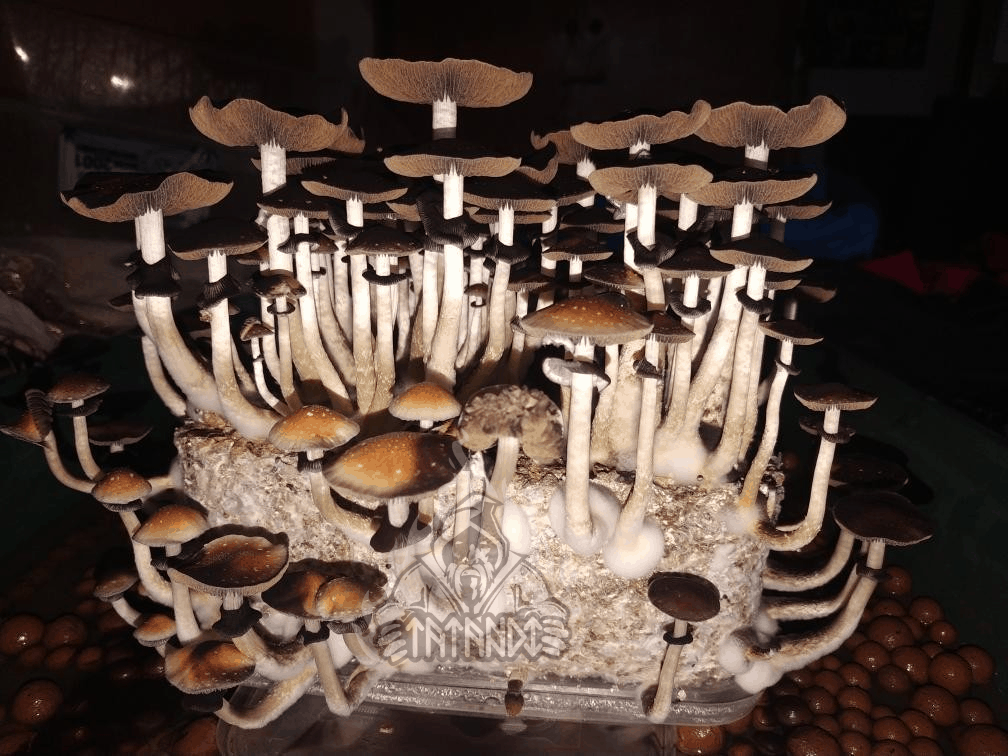
When you observe that the kit is completely colonized and full of small pins (baby mushrooms), it's time to transfer it to the greenhouse bag. Remove the lid (save it for future harvests) and place the kit inside the previously misted bag.
The key to success lies in maintaining the perfect balance between humidity and ventilation. Use your phone's flashlight to verify the presence of shiny microdroplets on the substrate surface.
If the surface lacks microdroplets:
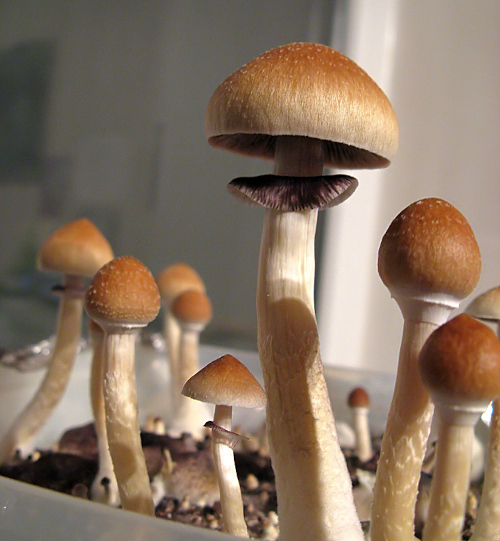
The optimal harvest point arrives when the mushroom veil begins to detach from the cap to release spores. The ideal moment to harvest them is just before or while that veil detaches, a process that usually lasts a few hours (approximately 5-6). That's why they might not be ready in the morning, but they could be ready by evening.
Always using gloves, gently twist each mushroom until it detaches from the substrate. This technique minimizes damage to the mycelium and preserves the kit's capacity for future harvests.
Tatandi kits allow obtaining multiple harvests from the same substrate through a rehydration process. Follow the steps we indicate below:
Repeat the cultivation process from the daily aeration step to obtain your second fruiting.
Growers with previous mycology experience can opt for more advanced techniques for substrate fruiting. A popular alternative consists of using monotubs, which are transparent plastic containers specially adapted with strategically distributed perforations.
These holes allow optimal gas exchange and ensure adequate air circulation, creating the necessary microclimatic conditions for successful fruiting body development. This system offers greater control over the cultivation environment and can be more efficient for those who already master the fundamentals of mushroom cultivation.

Cultivation with Tatandi is a practical and direct way to get into mycology from home. Their system is designed to simplify the process without losing effectiveness, which allows following closely how mushrooms develop without needing prior experience.
The key is maintaining good hygiene, controlling humidity and ventilating when needed. Following these steps, it's possible to obtain several harvests with a single kit.
Ready to start?
Related posts

How to prevent and treat contamination in mushroom cultivation
Published :
2025-07-14 09:36:11

Complete guide to psychoactive mushrooms
Published :
2025-05-14 22:19:54

What are psilocybin microdoses and how do they work
Published :
2025-11-17 11:53:06
